Pages

Wednesday, July 27, 2011

Reusable & Washable Microfiber Swiffer Pads- Tutorial

Do you own a Swiffer Sweeper or a Wet Jet? I own both and I love them, except for having to buy replacement pads and cloths. They cost money and produce waste, two things that I am trying to do less of.

So I came up with my own, reusable, washable pads made from microfiber cloths.

Microfiber cloths are great for cleaning, but I have found that they can be a little pricey too. The best deal that we found was at Costco where we got 36 of them for I think about $30. They were in the car care section and are meant for washing cars, but they are the same as the ones meant for household cleaning.

Swiffer Sweeper and Wet Jet Cloths

So here is what you need:

1- 16"x16" microfiber cloth
cutting mat and rotary cutter or fabric scissors
sewing machine or serger
thread
scissors
2- 4" strips of 1/2" elastic (for wet jet cloth)


Cutting: 

Be sure to measure your swiffer and wet jet to be sure that they are the same as mine before starting. They should all be the same, but I would hate for you to go through all the steps and have them not fit. For each 16"x16" cloth, you will be able to make 2 sweeper cloths and 1 wet jet cloth. The bottom of my sweeper measured 10"x4 1/2" so in order to be long enough to clip in the slots, these cloths will be 10" by 8". My wet jet was 10 1/2"x4 1/2" so the cloth will be 11"x5".


Lay out your cloth on your cutting mat, and measure 10" from one side. Cut along this line.

Now take that 10"x16" piece you just cut. Cut this piece in half to get 2 - 8"x10" pieces. These will be for the sweeper.

 Now take the 6"x16" strip left over from the first cut. Measure 5" from the finished side, and trim so that it is 5"x16". Then measure 11" in length and trim it to 11". This gives you a final size of 5" x11".

(I show two in this picture because I actually cut up 2 cloths, giving me 4 sweeper cloths and 2 wet jet cloths)

Finishing the edges:

If you have a serger, this step is easy, just serge the edges and you are done, but for most of us who don't have one, we will be using a zig zag stitch to finish the edge and prevent fraying and prevent all the little microfiber fuzzes from coming off.

Each cloth should have 2 unfinished edges, so start on an unfinished edge where it meets with an unfinished one. My sewing machine has 4 widths for a zig zag, 1 being the narrowest and 4 being the widest. For this I set mine to 3.

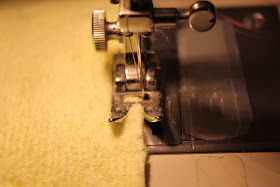
 Make sure to have the side lined up so that the needle just barely misses the edge. Go back and forth a few times when first starting and then just all the way along one side.
 When you get to the corner, just lift up the foot and rotate the cloth without pulling on the thread too much or having to cut it. Do the same stitching for this second edge. When you get to the end, go back and forth a few times.
Now you can either cut the threads here, or very carefully, flip the whole thing over to the opposite side. We are going to zig zag the edges again, only this time doing it from the back of where we did it the first time. This will reinforce the zig zag a little better and prevent more of the fuzzies from coming off when you wash it. Do the same thing you did above, turning at the corner with out cutting the threads. Be sure to go and back and forth when get to the end so your threads don't unravel.
Repeat this for all three of the cloths. I switched thread colors after doing the 2 sweeper cloths so that my wet jet cloth would be a different color and it would be easier to see the difference when they are done.

Now your sweeper cloths are all done!

Sewing on elastic for Wet Jet cloths:

Take your first piece of elastic and about 2 inches or so in from one of the long sides, place elastic about 1/4" -1/8" in from the edge. You can pin it in place, or just carefully line it up on the sewing machine using the presser foot to keep it in place. Using the zig zag stitch again (this time I narrowed mine down to a 2) zig zag back on forth on the elastic 3 or 4 times so that it is securely attached to cloth.
 Now is the tricky part, you need to sew the other edge of the elastic to the opposite side of the cloth. Make sure that it is all oriented correctly, and then sew this one in place the same way as above. You need to hold the elastic out of the way of needle as you sew.
 Repeat for the other side of the cloth using the second piece of elastic and then you are done.
I am really happy with how they turned out!. The wet jet one is a little tricky to get on because of the velcro on the bottom and it is harder to push around then the wet jet pads you buy, I think it actually does a better job of picking up dirt and cleaning. It takes more muscle to use, but I could use the work out :) When you are done cleaning, just throw them in the washing machine and you can use them over and over again.

Now I just need to find a way refill the cleaning solution bottle so I don't have to keep buying that too.

Shared on:
Creations by Kara

Craft Junkie Too Friend

Tuesday, July 26, 2011

GIveaway winner!

Thank you to everyone who entered the giveaway! According to random.org the winner is comment #13: 
 
Congratulations to the winner RBadger!

Please email me mcodde[at]gmail[dot]com with your earring choice and an address I can ship them to.


Check back tomorrow when I will have a new sewing/cleaning tutorial posted. I can't wait!

Monday, July 25, 2011

Homemade Whole Wheat Hamburger Buns

Remember today is the last day to enter our giveaway. There are not very many entries, so your chances of winning will be very good!

 
Do you have a favorite whole wheat bread recipe? Did you know that with most bread recipes you can make things other than loaves of bread? With the recipe that I use, I make pizza, rolls, calzones, stuffed braids, rounds, hot dog buns, and hamburger buns. The hamburger buns are so good, that I never by buns anymore. These taste so much better and are so much healthier for you. I wish I could share my recipe, but it is not really mine so if you are interested in it, then you need to go here.

The good thing is, that you can make these with most bread recipes. The key is just in how you shape the dough before letting it rise. For hamburger buns, you want to shape the dough into flat discs, about 2/3 to 1/2 the diameter of how big you want the finished buns to be.

In this picture, I made 5 larger buns and the 4 kid sized ones. Once they are shaped, place them on a greased cookie sheet, cover with a cloth, and set in a warm place to rise. When they double in size or get to the size that you want (don't let them get too big or they will collapse) stick them in a 350 degree oven for 12-15 minutes (this really depends on your oven and your recipe so watch them carefully). If you want them to look really professional, you can add some sesame seeds to the top before you stick them in the oven.

 When you take them out, place them on a cooling rack and you should have your own beautiful buns. If they don't come out looking perfectly round and smooth, that's okay. Just call them "rustic" and people will think you made them that way on purpose :)


Shared on:


Friday, July 22, 2011

Why you should never let your dog pee on your air conditioner

This is Tobey. He used to be our dog. He was a good dog, just nervous and anxious. He also did not like our young kids which although he never hurt them, he would growl every once in a while which made me nervous. He also barked quite a bit. He was really sweet though and we loved him so we put up with it.

Until we went to turn our AC last month and it didn't work. We called a repair man to come look at it. As soon as he opened it up, you could smell the dog urine. As it turns out Tobey had been peeing on it all winter long and we didn't really realize how much damage it could do and how much he was doing it. He had me spray it down and all the aluminum things came off.
Then we could really look at the coils and they were completely corroded. All of our refrigerant had leaked out because of all the leaks in the coil. He said it was the worse he had ever seen. It was too much corrosion to just repair so we had two options, replace the coil or just replace the whole thing.

We were leaving in a week for our 3-week CA vacation so we decided to just wait it out until we got back. I was so mad at the dog though. It was the final straw. We had 5 days until we were leaving and I decided that he would be gone before we left. I put ads online for him, but in the end no one responded so we took him to a shelter that had a very high adoption rate (I think it is 98%). Hopefully he is in a happy home with older kids who love him and play with him.

We came back to a HOT house. By opening up the windows at night we could cool it down to about 75-80 degrees by the morning, but even by closing everything up and all the blinds it would still get to 87-90 degrees by the early afternoon. It was miserable. We were all so sweaty.

Finally on Wednesday afternoon/evening, we got it replaced. We decided that it would be more cost effective to upgrade to bigger unit that was slightly more energy-efficient and used the more environmentally friendly refrigerant. It was a big chunk of change, but so worth it. Just look at the new beauty:
Isn't she pretty :)

Don't forget... Just a few more days to enter the giveaway.

Wednesday, July 20, 2011

First GIVEAWAY!!!


This blog is relatively new and I want to get the word out and get more readers, so I am doing my first GIVEAWAY!  The winner will be selected at random from the comments and will receive one free pair of post earrings (winner's choice) from my etsy shop

Here is how you can enter (leave a comment on this blog for each thing that you do, telling me what you did) :
  1. Leave a comment on this blog telling me what kind of projects your interested in (sewing, recipes, crocheting, etc.)
  2. Visit my etsy shop and tell me your favorite item in your blog comment.
  3.  Like Ris C on facebook
  4. Become a follower of this blog (see side bar)
  5. Share this giveaway (include a link) on your blog or on your facebook status.


That gives each person 5 chances to win if you do all 5! 

Be sure to leave a way to contact you on one of your entries. Giveaway will close on Monday July 25th at 11:59PM MDT. Winner will be selected via random.org on Tuesday July 26th and will have 7 days to claim their prize. If after 7 days, the winner has not responded, then a new winner will be chosen. I can only ship to the U.S. so open to U.S. residents only.

If I can get 50 followers on this blog, then I will pick two winners! Good luck and start sharing!

Tuesday, July 19, 2011

Dangle Earrings

 I recently ventured in the world of beading and dangle earrings. It was harder than I thought, but so much fun and so many possibilities. I had to get a little tool help from my husband, but hopefully I will catch on quick. I love how beautifully the red, black and pearl go together on these ones.

 For these brown ones, I decided to just leave them simple without any beads.  What do you think? Look for both of these pairs in my shop and more as I add them.

Thursday, July 14, 2011

Seven-Minute Frosting

How was your 4th? I know it was a while ago, but we just got home from a 3-three week vacation to visit our families in CA so this is my first chance at blogging about it.
Every year, my family has a huge BBQ and get together on the 4th. It started with my Grandparents and neighbors on their street. Many families on the street would get together for a bike parade and food. The tradition continued as the kids grew up and when I was a child we would bring our decorated bikes over to grandma's house for a parade and then food in her neighbors back yard. As more cousins came along, it just got too crowded, so the party moved to my Aunt's house where there was more room for everyone. Now that I am grown and have kids of my own, we still try to schedule our summer CA trip so that we can make it. It is always so much fun!


One of the (many) traditions is these devil's food cupcakes with seven-minute frosting. They usually have little flag toothpick decorations on top, but I forgot to get pictures of it before I took it off. The frosting is the best part. It is a meringue like frosting that is light and airy, but a little crispy on the edges after it sets. It tastes a little like marshmallows, but better. It takes a little work, but it is so worth it. Give it a try and I promise you will not regret it.


Seven-Minute Frosting

2 egg whites
1 ½ C sugar
Dash salt
1/3 C water
¼ t cream of tartar
1 t vanilla

Combine eggs, sugar, tartar, salt and water in top of double boiler. Beat 1 min w/ beater. Cook over boiling water, beating constantly for 7 minutes until stiff peaks form. Remove from heat. Add vanilla. Beat until spreading consistency. Immediately spread over cake or cupcakes.

Shared on:
Creations by Kara

Friday, July 1, 2011

Where We've Been...

Sorry for the lack of recent posts. We are enjoying the sun in CA and visiting our families. One perk of having a teacher for a husband...long summer vacations.