
Ever since Disney's Jake and the Neverland Pirates was made available on Netflix, my son has been obsessed. A month ago, I asked him what he wanted to be for Halloween and he said a dragon. I was not excited about that costume. We have been really busy lately and that just seemed like such huge costume project. I was so happy when he changed his mind and wanted to be Jake instead.

Jake is such a fun and EASY costume to make. I could have completed all of it in just one day, except I only had a few hours here and there that I worked on it. This pattern and tutorial is for a size 4T, but it could probably fit a 3-5 year old. If you want to make it bigger, just add more length and width to the vest pieces.
Jake the Neverland Pirate Shirt and Vest Tutorial
To view the tutorial on how to make the boots and belt click here
Materials:
Vest Pattern Pieces (click link to view and print pdf)
plain white T-shirt
leather/suede cording
scissors
1 yard of 72" wide blue felt
golden colored bias tape (I used .875 inch double fold quilt binding in Marigold)
golden yellow adhesive felt circles (or just felt and glue)
thread
needle
sewing machine

Start by taking your T-shirt and cutting off the collar, sleeve hems, and bottom hems to give them a raw edge. It is a jersey knit so it won't fray.

Cut slits in the sleeves,


And that is it for the shirt! So easy!
Now for the vest:
Click on the Pattern Pieces link and print off the pattern. Then cut them out, line up the dots on the front and back vest pieces and tape them together. This pattern is for a size 4T. It fits my big 3 year old and can probably fit up to a small 5 year old.
Lay the pattern pieces on the folded up piece of blue felt, with the back and back collar pieces on the fold as indicated.

Cut out the felt.

Place the right sides together of the front and back vest pieces and sew along top of shoulders and down the side on both sides (1/2" seam). Do not sew up the arm hole.

Place the right sides together for the Collar pieces and sewn along top shoulders.

Pin RIGHT side of collar to the WRONG side of the vest as shown, then sew together.
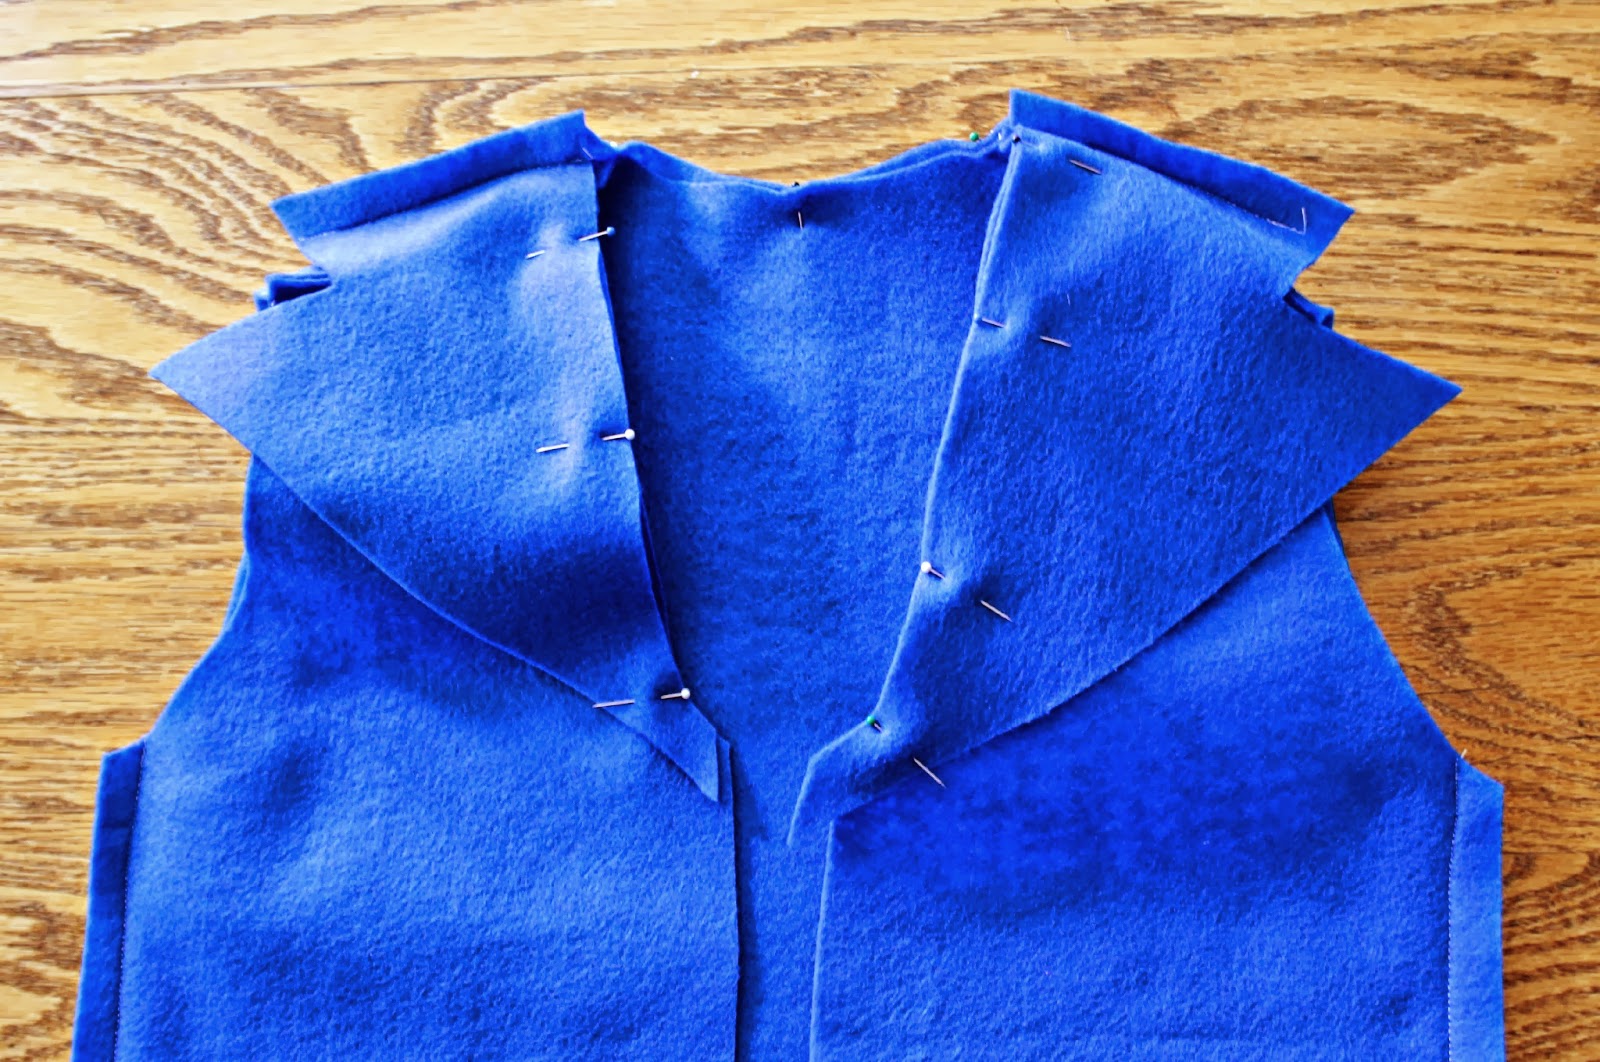
It feels wrong when you do it, but when you are done and you flip everything out to the right side, it should look like this:

Even out any of the seams that don't line up just right by trimming off a little of the felt. I made up this pattern pretty quickly so the collar pieces don't line up just right, but that is an easy fix.


Now to add the bias tape trim. Open up the bias tape and sandwich the edge of the vest (I start on the bottom in the back where the seam is less obvious) and sew on about 1/8" from the edge. The corners can be a little tricky, but I mitered them the same way you would miter the corners on a quilt binding.

The inside corner was tricky too, I had to fold it under a bit and it still looks a little funky, but it works.

When you get back to where you began, fold under the edge and then sew it closed.

For the buttons I used felt adhesive circles that I use for the underside of headbands, but if you don't have these, you can just cut some circles out of felt and glue or sew them on. You can also add real buttons, but I was trying to keep the cost and difficulty down.

Because felt doesn't iron real well, I tacked down the front of the collar in 2 spots so that it stays down and look better.

Then you are all finished! I have another tutorial coming soon on how to make the belt and boots

I made this for my son today. Thanks so much for the pattern! I used yellow duct tape around the edge, but it looked fine. This was only the second thing I've ever sewn. :) -Jennifer K.
ReplyDeletePlease help! The vest tutorial link has been disabled. Could you please fix the link or email me the pattern? Thank you so much!
ReplyDeleteThe link should work now...let me know if you have anymore trouble. :)
ReplyDeleteYou're my hero! My son asked for Jake and the Neverland Pirates as the theme of his birthday, which is only a few days away. He's looking forward to dressing up like Jake. Thank you so much for this very cute and easy to follow tutorial. I hope to see more from you! :)
ReplyDeleteThis comment has been removed by the author.
ReplyDeleteThank you for this tutorial! I made this (2nd time) tonight and what i found to be easier was sew on the yellow first onto all the pieces and then sew it together.
ReplyDeleteHelp! I would love your pattern but I can't find your link for the vest.
ReplyDeleteJust click on the words "vest pattern pieces" in the materials list. Those words are the link to the pattern pieces :)
DeleteI made this for my husband (we do have a daughter who is the Pirate Princess and I am Izzy...we're not weird!!) and after a lot of trial and error to get the proportions correct, I successfully made an adult size vest. I am a sewing novice so increasing the size of the pattern was a challenge for me. Thank you so much for your tutorial!
ReplyDeleteHi, could you please send me the patterns? The link above is not working anymore :( a.simic@gmx.net
ReplyDeleteThe link seems to be working just fine for me? Are you clicking on the words "pattern pieces"? It should take you to a dropbox page where you can download the pdf.
DeleteThe link is not working, is it still available?
ReplyDeleteIt should be. I just tried it and it works just fine on my computer and on my phone? Are you clicking on the words "Vest pattern pieces" on the list of materials?
DeleteI changed the collar to be leaf-shaped for a Terence (disney/fairies, neverbeast)vest. I added about an inch to the back (along fold and sides) to make it a tad larger. Perfect! Thank you so much!!
ReplyDelete