Showing posts with label halloween. Show all posts

Wednesday, October 24, 2012

Toddler Alligator Costume


 To go with the Princess Tiana theme for Halloween, I made an alligator costume for my 2-year old son. It is perfect for his personality. He is so sneaky and gets into everything. I definitely have my hands full with this little guy.


I used simplicity pattern 2506 for the body. It is actually a dinosaur costume, but alligators are reptiles so I think it works. I followed the pattern exactly except for adding the contrast stitching across the tummy to make it look more like an alligator belly. I used a warm cozy fleece so that it would be comfortable and warm while trick-or-treating.


The tail is stuffed with fiber-fil and is so fun. My son kept trying to grab it and it was fun to watch, kind of like watching a dog go in circle trying to catch its tail. 


The back closure is make of velcro which makes it easy to take on and off. Perfect for my squirmy on the go little guy.


I came up with the head after seeing this Wolf costume from Make-it Love-it. I used a baseball hat for the base, added some plastic canvas for the snout and then covered the whole thing with the fleece hood. Some of it is sewed together and then glued to the hat with hot glue. It took a few tries to get the nose sewed together just right. It was tricky to the get the curves right and then I stuffed it with a little fiber-fil to give it more dimension. The eyes, teeth and nostrils are made of felt from my stash.


I added a velcro chin strap to help keep it on his head so he is free to run without it falling off.


I absolutely love how this one turned out. It is so perfect!


Homemade Princess Tiana Costume

 
This year my daughter wanted to be Princess Tiana for Halloween. I was very happy. She has been a little obsessed with My Little Pony lately and I was scared she would want to be a pony for Halloween. A princess is much easier and fun for me to make. I love making Halloween costumes, especially when the results turn out so great!


I started with a pattern (McCall's 6619) and then tweaked it to make it look like Tiana's dress. I used costume satin for the bodice, skirt and peplum, and tulle for the overlay. I think the lace and sequins give it more of a princess look although they aren't really authentic to Tiana's real dress.


The thing that I liked about this pattern is that it is more like an apron then a dress. The back is open and has a tie closure. It makes it so much easier to get on and off and will make dress-up play easier when it gets added to the dress-up bin after Halloween.


I came up with the design for the flower on my own. I cut some petal shapes out of leftover ivory satin and heat sealed the edges so it wouldn't fray. I sewed the ends together tight to make the flower shape and then soaked the whole thing in spray starch a few times as I shaped in to the flower shape that I liked. After it was all dry I added the ribbon and jewel center. I pinned it to the dress instead of sewing in on permanently so that it can be removed when the dress is washed.


For the bottom, I used a woodburning/hobby tool to carefully cut off the bottom and give it the zig zag shape edge. The tool  is nice because it melts the edge to keep it from fraying while cutting it at the same time. 


It ties in the back in this big beautiful bow and then I added the button and elastic loop by the straps because the bodice was a little too loose on the top for my skinny daughter. 


We are so excited to wear it trick-or-treating!


Tuesday, October 9, 2012

Crochet Frog Hat Pattern


When my oldest daughter decided that she wanted to be Princess Tiana for Halloween, I figured it would be perfect for her baby sister to be a frog. I decided that it would be fun to crochet her a frog hat for her costume. I searched for a pattern to use, but didn't like most of what I found, so I just made my own.

I love how it turned out and the fact that she can wear it all the time, and not just for Halloween. I finished it just in time too. It has started to get cold here, especially in the mornings and now she has something to keep her head warm.

This pattern has not been tested and I wrote it as I went. If you find any mistakes or have any corrections, please let me know. Thanks!


Crochet Frog Hat
fits infants about 3-6 months

Materials needed:
Size G crochet hook
Yarn- medium weight in 4 colors:  a large amount of green, and small amounts of a contrasting color, black, and white. (I used Hobby Lobby's "I Love this Yarn" in Limelight for the green, Red Heart super saver in shocking pink for the contrast color, and Hobby Lobby's "I Love this Cotton" in black and white for the eyes and mouth. It is probably better to use all of one kind of yarn for the project, but I just used what I already had.)
Tapestry Needle to weave in ends, attach eyes and cheeks, and embroider mouth.

I give the approximate number of stitches in each row, but if you are off by one or two stitches it should still still work.

Hat with earflaps:
Ch 3, sl st to form a circle

Row 1: Ch 2, 13 dc in circle, sl st to top of ch 2 to join (14 dc).

Row 2: Ch 2, 1 dc in same stitch as ch 2 and then 2 dc in ea remaining stitch, sl st in top of ch 2 (28 dc).

Row 3: Ch 2, 1 dc in same stitch as ch2, *(1 dc in next  2 stitches, and the 2 dc in next stitch) repeat around, sl st into top of ch 2 (about 39 dc).

Row 4: Ch 2, 1 dc in same stitch as ch 2, *(1 dc in next 3 stitches, and 2 dc in the next stitch) repeat around, sl st into top of ch 2 (about 50 dc).

Row 5: Ch 2, 1 dc in same stitch as ch 2, *(1 dc in next 4 stitches, and 2 dc in the next stitch) repeat around, sl st into top of ch 2 (about 61 dc).

Rows 6-13: Ch 2, 1 dc in ea stitch around, sl st to top of ch 2 to join.

Row 14: Ch 2, 1 dc in ea of next 8 stitches,  then make ear flap #1:

  1. sc in each of next 11 st, ch 1 turn
  2. sc2tog, 1 sc in each of next 7 stitches, sc2tog, ch 1 turn
  3. sc across (9 sc)
  4. sc2tog, 1 sc in each of next 5 stitches, sc2tog, ch 1 turn
  5. sc across (7 sc)
  6. sc2tog, 1 sc in each of next 3 stitches, sc2tog, ch 1 turn
  7. sc across (5 sc)
  8. sc2tog, 1 sc, sc2tog, ch 1 turn
  9. sc2tog, 1 sc, ch 1 turn
  10. sc2tog, ch1 and then sc down side of flap toward opposite side of where you started the earflap, when you get to bottom, continue row 14:

1 dc in ea of next 18 stitches, then repeat steps 1 through 10 to make second earflap. When complete, finish row around with 1 dc in each stitch and sl st to top of ch 2, fasten off and weave in ends.

Contrast:
In contrasting color, (I used Shocking Pink) sc around bottom edge of hat and earflaps. I would start in back and then join with a sl st at end. Fasten off and weave in ends.

Eyes (Make 2):
In green:
Row 1: Ch 3, 11 dc into 3 ch from hook, sl st to top of ch 2 to join (12 dc).

Row 2: Ch 1, 1 sc in same stitch as ch 1 and 2 sc into each stitch around, sl st to top of ch 1 to join. (24 sc)

Row 3: Ch 2, 1 hdc into ea stitch around, sl st to top of ch 2 to join, fasten off leaving long tail (at least 12 inches).

In white:
Row 1: Ch 3, 11 dc into 3 ch from hook, sl st to top of ch 2 to join (12 dc)

Row 2: Ch 1, 1 sc in same st as ch 1 and 2 sc into each stitch around, sl st to top of ch 1 to join, fasten off leaving long tail (24 sc)

In black:
Row 1: Ch 3, 9 dc into 3 ch from hook, sl st to top of ch 2 to join, fasten off leaving long tail (10 dc).

Assembly:
Attach black circle to white circle using the black tail. (I like it to be off center, but you can make it look whatever direction you want)

Attach white circle to green circle using long white tail, if you stitch it carefully, you can make it so the white stitches do not show on the back of the green circle.

Attach green circles to hat, I like them to be evenly spaced apart from the center, but more towards the front at about row 4 of the hat.

Rosy cheeks and mouth:
In pink (make 2):
Row 1: Ch 3, 11 dc into 3 ch from hook, sl st to top of ch 2 to join, fasten off leaving long tail (12 dc)
weave in center tail, then attach to hat using long end tail.

In black, using back stitch and a tapestry needle, embroider mouth between the two cheeks.

Finishing:
Take 3 lengths of green, 2 of hot pink and 1 each of black and white yarn that are approximately 25-30 inches long (I just eyeballed the length) and loop center through bottom of earflap. Braid for 10-12 inches and then overhand knot. Trim yarn ends. Repeat for second earflap.

For PERSONAL USE ONLY, please do not sell the final product or claim the pattern as your own. I would love for you to share your work, but please link back to this pattern. Please do not republish this pattern in any form. Thanks!

UPDATE: Due to the popularity of this hat, I have had several instances where people have stolen pictures from this post to use to sell this hat which is not only dishonest, but illegal. I have had to watermark all of these images to prevent this from happening more. If you come across any of my photos that someone is using illegally to sell this hat, please let me know by emailing at RisCHandmade@gmail.com


Monday, October 31, 2011

Halloween and Giveaway Reminder

We had a Halloween party at our church on Saturday and our amazing photographer neighbor took pictures of the kids in their costumes beforehand. I love how they turned out!

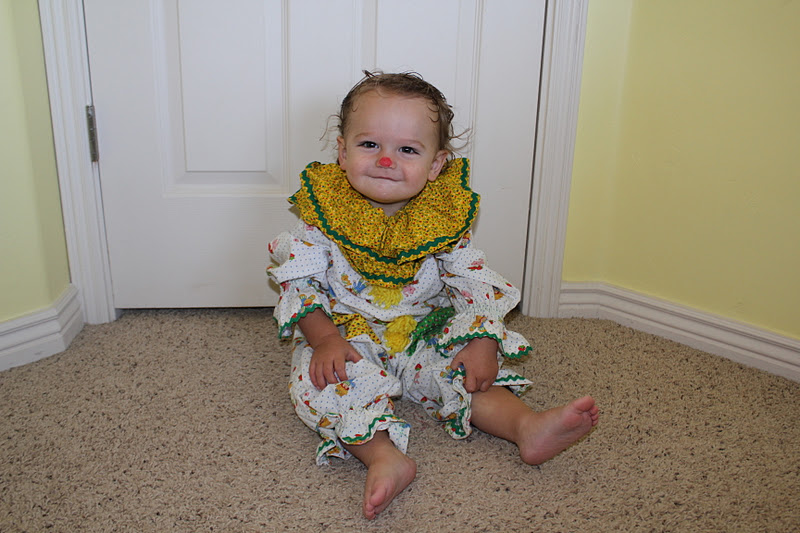
My son was a little grumpy so his pictures ended up being sad clown pictures. He is still adorable in them though. 

Also, just a reminder, TODAY is the LAST DAY to enter the giveaways at Family Ever After. Click HERE to see a recap of all of the giveaways and be sure to scroll down to Giveaway #7 where you can enter to win a $15 Gift Certificate to my shop!!! You have until midnight to enter so do it now before you forget!!!!

Thursday, October 27, 2011

Halloween Pictures from the Past

Today my mom emailed me this picture. This was back in 1984 (or 1985, we are not sure). Originally she told me she couldn't find one of me in the clown costume, but I am glad she did! I love that my mom almost always made our costumes.

 
 This one is one of my favorites, salt and pepper shakers. So creative.
 
I think this one is so funny. My little sister looks like such a sad clown. I like how my brother's shirt is only half tucked in and I love that I am wearing socks over my tights, so 80's. 

Oh the green carpet too. We lived in that house with the ugly green carpet for almost 20 years. Then when we went to sell it, we tore up the carpet to discover it had beautiful hardwood floors underneath.

Wednesday, October 26, 2011

Vintage Clown Costume and Replacing Old Elastic

 This was my brother back in 1982. Yep, 29 years ago, in a clown costume that my mom made.
 Don't you just love the shag carpet?

My mom kept this costume and gave it to me a couple of years ago for my daughter to wear. The collar was lost as well as the pom pom buttons. I made some new pom poms and  just glued them on.

I also made a new collar. I was lucky enough to find this yellow floral fabric at walmart that almost matched the yellow patch on the costume.
I
 I just made a large rectangle, sewed an elastic casing in the middle and then added some green ric rac to match the rest of the costume.


One thing that I did not do when my daughter wore it was replace the old elastic. We had to pin the neck together to keep it on her and the arms and legs were really loose.  I regretted not doing that.

Halloween 2009

My son will be wearing this costume for Halloween this year so I figured I better do it this time.

First I did the neck elastic. This one was really easy, The elastic was already sticking out a bit, so I just used a seam ripper to open it up a bit.

Pulled the old elastic out (I had to cut it since the ends were sewn together),

Then threaded some new elastic in, sewed the ends together by zig zagging back and forth a few times, and then closed up the casing again. Super easy.

Next was the sleeves and legs. These were a little bit more difficult because there wasn't a continuous elastic casing. The elastic was actually sewn into the seam. I don't like this kind of casing so I decided to take it out and change it.

Using a seam ripper, I opened up the seam just where the elastic and bias tape casing were attached,

Undid the stitches that held the elastic in the casing before the seam was sewn shut (those little white stitches in the picture)

and then a little of the casing on each side of the seam.

I sewed the seam back together again without the bias tape casing and ironed it open and flat.

 Then I folded the ends of the bias tape under so that the folded ends line up with the seam.


I sewed the casing back on, leaving the folded ends unsewn and open.

Then you can just slip the new elastic in through the opening, and thread it through.

I glued the ends together with a little fabric-tac to make it easier to sew.

 Then secured them together with a few zig zag stitches,

I then unbunched the the sleeve to pull the extra elastic in and it dissapeared into the casing. No need to sew up the opening.
I did the same thing for both arms and legs and then the costume was done and ready for Halloween!


 Much better


 Doesn't the little guy look adorable in it!

We can't wait for Halloween!!