Showing posts with label sewing. Show all posts

Wednesday, October 24, 2012

Toddler Alligator Costume


 To go with the Princess Tiana theme for Halloween, I made an alligator costume for my 2-year old son. It is perfect for his personality. He is so sneaky and gets into everything. I definitely have my hands full with this little guy.


I used simplicity pattern 2506 for the body. It is actually a dinosaur costume, but alligators are reptiles so I think it works. I followed the pattern exactly except for adding the contrast stitching across the tummy to make it look more like an alligator belly. I used a warm cozy fleece so that it would be comfortable and warm while trick-or-treating.


The tail is stuffed with fiber-fil and is so fun. My son kept trying to grab it and it was fun to watch, kind of like watching a dog go in circle trying to catch its tail. 


The back closure is make of velcro which makes it easy to take on and off. Perfect for my squirmy on the go little guy.


I came up with the head after seeing this Wolf costume from Make-it Love-it. I used a baseball hat for the base, added some plastic canvas for the snout and then covered the whole thing with the fleece hood. Some of it is sewed together and then glued to the hat with hot glue. It took a few tries to get the nose sewed together just right. It was tricky to the get the curves right and then I stuffed it with a little fiber-fil to give it more dimension. The eyes, teeth and nostrils are made of felt from my stash.


I added a velcro chin strap to help keep it on his head so he is free to run without it falling off.


I absolutely love how this one turned out. It is so perfect!


Homemade Princess Tiana Costume

 
This year my daughter wanted to be Princess Tiana for Halloween. I was very happy. She has been a little obsessed with My Little Pony lately and I was scared she would want to be a pony for Halloween. A princess is much easier and fun for me to make. I love making Halloween costumes, especially when the results turn out so great!


I started with a pattern (McCall's 6619) and then tweaked it to make it look like Tiana's dress. I used costume satin for the bodice, skirt and peplum, and tulle for the overlay. I think the lace and sequins give it more of a princess look although they aren't really authentic to Tiana's real dress.


The thing that I liked about this pattern is that it is more like an apron then a dress. The back is open and has a tie closure. It makes it so much easier to get on and off and will make dress-up play easier when it gets added to the dress-up bin after Halloween.


I came up with the design for the flower on my own. I cut some petal shapes out of leftover ivory satin and heat sealed the edges so it wouldn't fray. I sewed the ends together tight to make the flower shape and then soaked the whole thing in spray starch a few times as I shaped in to the flower shape that I liked. After it was all dry I added the ribbon and jewel center. I pinned it to the dress instead of sewing in on permanently so that it can be removed when the dress is washed.


For the bottom, I used a woodburning/hobby tool to carefully cut off the bottom and give it the zig zag shape edge. The tool  is nice because it melts the edge to keep it from fraying while cutting it at the same time. 


It ties in the back in this big beautiful bow and then I added the button and elastic loop by the straps because the bodice was a little too loose on the top for my skinny daughter. 


We are so excited to wear it trick-or-treating!


Monday, May 7, 2012

Car Seat Cover

I have been busy getting ready for baby who is due any day now. I am technically not due until May 31st, but my son was born at 37 weeks, and I will be 37 weeks this Thursday. I am just trying to not get my hopes up too much that she will be early like him.

A good friend of ours gave us this car seat and I decided that I wanted a cover for it. With our other two kids, we just threw a blanket over the whole car seat, but it would slip off easy or blow off in the wind. I am hoping this one will work better, although I did just see one with elastic along the bottom and I might try that too if I find the time.

I used this tutorial from cluck cluck sew and it was super easy and quick. I think the hardest part for me is cutting everything out because I am a perfectionist.


 My son keeps putting his sister's dolls in the car seat, pretty cute.

I just used some light cotton fabric from Joann's. Since she will be mostly using this during the summer, we wanted something light that wouldn't absorb too much heat. 


The handles of my car seat are at a weird angle, so my velcro attachments had to be at a weird angle too. I just laid the cover on top of the car seat and then eyeballed where they should go. 

See, super easy, basically it is just a big rectangle with rounded corners and then two smaller rectangles with velcro. Can't wait for baby girl to come so we can use it!

Monday, February 20, 2012

Teal Petal Dress


Last month I saw this darling dress and tutorial on icandy:

Its one of those dresses that as soon as I saw it, I knew I just had to make it. I see a lot of cute dress ideas and think "I should make that", but this one was different. I was so excited by this one and knew how much daughter would love it. Ideas immediately started coming to me as I planned it in my head.

I started with a twin size sheet that I found at wal-mart for $5. I knew that if I let my daughter pick the color, she would choose pink, but I wanted something bolder so I went with this teal blue. I thought it would be such a pretty color on her, and it really is. She has gray-blue eyes and this color really brings out the blue.


I followed the tutorial on icandy almost exactly, except making the bodice a little narrower for my skinny girl (I probably could have made it even narrower) and I made puff sleeves.


I also chose to sew the petals to the skirt before sewing it to the bodice while it was still one big rectangle. I layed them out and rearranged them a few times before I was happy with it. I also cheated and used the finished edge of a side of the sheet as the bottom hem so I would not have to hem it.

I left one petal off the back center and added it after it was all sewed together because it was right on the middle of the seam. It hid the seam well and gave the petals a more continuous look in the back.

I had a sash for the waist cut out of the teal fabric, but I thought it needed some contrast. I found some wide black grosgrain ribbon in my stash and it was perfect. The black and teal look great together and the stiffness of the ribbon makes for a big bow when tied in the back. I tacked it down in a few places in the front and sides to keep it in place.


I took the fabric I had already cut for the stash, cut it into long strips and made these folded fabric roses. They were originally going to be for a headband, but I loved how they looked on the waistband. I think they really complete the whole look. I made one more for a matching hair clip too.


My daughter's 4th birthday is coming up next week and I was going to save it until then and give it to her for a birthday present, but I just couldn't wait to have her try it on. I finished it in time for church yesterday and decided it will just be an early birthday present.


The best part is that she loves it, even though it is not pink!

Linked up with:
Made by You Monday on Skip to My Lou 


Creations by Kara


This dress in my official entry for sew-vivor! Wish me luck, the competition is fierce!

Tuesday, February 7, 2012

What I've been working on...

I have spent every free moment that I have had the last month working on a pinwheel quilt for my daughter. It is my first quilt and it is twin sized. I should have started smaller, but I like to just dive into things. It has been quite the learning process, but I am happy to announce that I finished all of my pinwheel blocks last night and now I just need to sew them all together (and do a bunch of other things...). I can't wait to show you guys when I am all done.

I just hope that my 30+ year old machine will hold up long enough to finish and let me free motion quilt it when the time comes. There have been quite a few nights where I have just wanted to throw the machine out the window, but I have resisted. 

Wish me luck!!!

Wednesday, January 4, 2012

Getting Organized- My Craft "Room"

 Over the Christmas break, one of my husband's goals was to help me to get organized. He did this by installing a whole bunch of shelving down in my basement/dungeon craft room. I will admit, I am a bit embarrassed to share these pictures as it is far from pretty, but it serves its purpose and all my stuff is out of the reach of sticky little kid fingers. I love how I can work on a project and just leave it out, where before I would I have to take out everything when the kids were napping or went to bed and then hurry and put it all away before they woke up. It was hard to get anything done.

The only bad part is that it is freezing down there in the winter, so I tend to not do as much sewing in the cold winter months and when I do, it is small projects that don't take up too much time.

While installing the shelves, my husband saw all of thread and bobbins just sitting out on my craft table. It was a mess. I told him how it would be really nice to have some sort of way to organize them. He was like, "I'll just make something for you" and he dissapeared upstairs. I stayed down in the dungeon and continued to try and organize my stuff and I soon heard his drill upstairs. When I came upstairs, he was working on this:


I love having a "handy" husband. This took him all of an hour or less to make. He just drilled holes in a grid pattern at a slight angle and then cut up some dowels and glued them in the holes with wood glue. He made the dowels closer together on the bottom for the bobbins and farther apart on the top for the thread. It is perfect. 


Eventually  I plan on painting it to make it pretty, but for now its function is all I need. I have seen similar things in the stores, but it was so easy to just make one.

The rest is the embarrassing part. I really need to get organized, so I figure if I show these mid-progress pictures, than it will be motivation to get it done so I can share the "finished" pictures with you. The "before" was horrible, basically just a bunch of craft stuff piled on that little table with very little room to "work."

 The "room" is really a framed out future bathroom in our unfinished basement, hence all the pipes. The lighting is pretty horrible, but whenever I have intricate work, I usually just bring it upstairs anyway.


All those plastic bags sitting on top of my rolling carts are full of fabric and yarn for future projects that needs to be organized.


 So there you have it in all its glory. Hopefully I can get it organized real soon. I can't wait.

shared on:
creations by kara

Wednesday, October 26, 2011

Vintage Clown Costume and Replacing Old Elastic

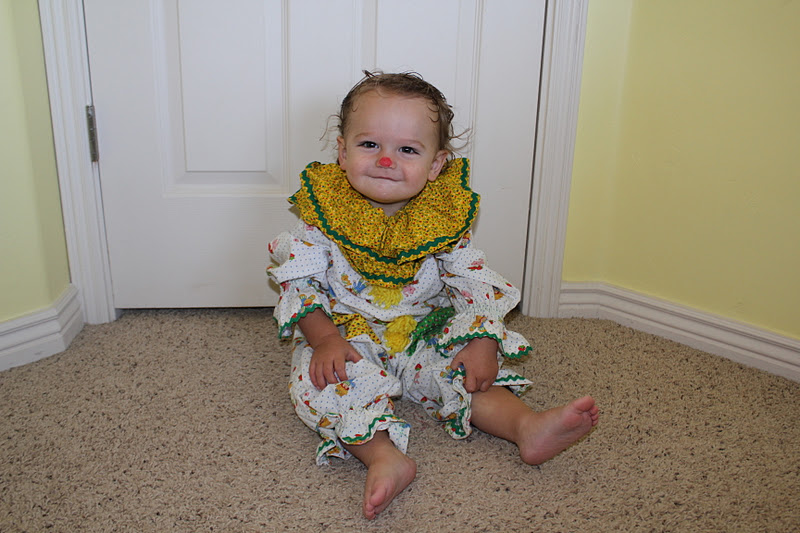
 This was my brother back in 1982. Yep, 29 years ago, in a clown costume that my mom made.
 Don't you just love the shag carpet?

My mom kept this costume and gave it to me a couple of years ago for my daughter to wear. The collar was lost as well as the pom pom buttons. I made some new pom poms and  just glued them on.

I also made a new collar. I was lucky enough to find this yellow floral fabric at walmart that almost matched the yellow patch on the costume.
I
 I just made a large rectangle, sewed an elastic casing in the middle and then added some green ric rac to match the rest of the costume.


One thing that I did not do when my daughter wore it was replace the old elastic. We had to pin the neck together to keep it on her and the arms and legs were really loose.  I regretted not doing that.

Halloween 2009

My son will be wearing this costume for Halloween this year so I figured I better do it this time.

First I did the neck elastic. This one was really easy, The elastic was already sticking out a bit, so I just used a seam ripper to open it up a bit.

Pulled the old elastic out (I had to cut it since the ends were sewn together),

Then threaded some new elastic in, sewed the ends together by zig zagging back and forth a few times, and then closed up the casing again. Super easy.

Next was the sleeves and legs. These were a little bit more difficult because there wasn't a continuous elastic casing. The elastic was actually sewn into the seam. I don't like this kind of casing so I decided to take it out and change it.

Using a seam ripper, I opened up the seam just where the elastic and bias tape casing were attached,

Undid the stitches that held the elastic in the casing before the seam was sewn shut (those little white stitches in the picture)

and then a little of the casing on each side of the seam.

I sewed the seam back together again without the bias tape casing and ironed it open and flat.

 Then I folded the ends of the bias tape under so that the folded ends line up with the seam.


I sewed the casing back on, leaving the folded ends unsewn and open.

Then you can just slip the new elastic in through the opening, and thread it through.

I glued the ends together with a little fabric-tac to make it easier to sew.

 Then secured them together with a few zig zag stitches,

I then unbunched the the sleeve to pull the extra elastic in and it dissapeared into the casing. No need to sew up the opening.
I did the same thing for both arms and legs and then the costume was done and ready for Halloween!


 Much better


 Doesn't the little guy look adorable in it!

We can't wait for Halloween!!