Showing posts with label patterns. Show all posts

Tuesday, October 9, 2012

Crochet Frog Hat Pattern


When my oldest daughter decided that she wanted to be Princess Tiana for Halloween, I figured it would be perfect for her baby sister to be a frog. I decided that it would be fun to crochet her a frog hat for her costume. I searched for a pattern to use, but didn't like most of what I found, so I just made my own.

I love how it turned out and the fact that she can wear it all the time, and not just for Halloween. I finished it just in time too. It has started to get cold here, especially in the mornings and now she has something to keep her head warm.

This pattern has not been tested and I wrote it as I went. If you find any mistakes or have any corrections, please let me know. Thanks!


Crochet Frog Hat
fits infants about 3-6 months

Materials needed:
Size G crochet hook
Yarn- medium weight in 4 colors:  a large amount of green, and small amounts of a contrasting color, black, and white. (I used Hobby Lobby's "I Love this Yarn" in Limelight for the green, Red Heart super saver in shocking pink for the contrast color, and Hobby Lobby's "I Love this Cotton" in black and white for the eyes and mouth. It is probably better to use all of one kind of yarn for the project, but I just used what I already had.)
Tapestry Needle to weave in ends, attach eyes and cheeks, and embroider mouth.

I give the approximate number of stitches in each row, but if you are off by one or two stitches it should still still work.

Hat with earflaps:
Ch 3, sl st to form a circle

Row 1: Ch 2, 13 dc in circle, sl st to top of ch 2 to join (14 dc).

Row 2: Ch 2, 1 dc in same stitch as ch 2 and then 2 dc in ea remaining stitch, sl st in top of ch 2 (28 dc).

Row 3: Ch 2, 1 dc in same stitch as ch2, *(1 dc in next  2 stitches, and the 2 dc in next stitch) repeat around, sl st into top of ch 2 (about 39 dc).

Row 4: Ch 2, 1 dc in same stitch as ch 2, *(1 dc in next 3 stitches, and 2 dc in the next stitch) repeat around, sl st into top of ch 2 (about 50 dc).

Row 5: Ch 2, 1 dc in same stitch as ch 2, *(1 dc in next 4 stitches, and 2 dc in the next stitch) repeat around, sl st into top of ch 2 (about 61 dc).

Rows 6-13: Ch 2, 1 dc in ea stitch around, sl st to top of ch 2 to join.

Row 14: Ch 2, 1 dc in ea of next 8 stitches,  then make ear flap #1:

  1. sc in each of next 11 st, ch 1 turn
  2. sc2tog, 1 sc in each of next 7 stitches, sc2tog, ch 1 turn
  3. sc across (9 sc)
  4. sc2tog, 1 sc in each of next 5 stitches, sc2tog, ch 1 turn
  5. sc across (7 sc)
  6. sc2tog, 1 sc in each of next 3 stitches, sc2tog, ch 1 turn
  7. sc across (5 sc)
  8. sc2tog, 1 sc, sc2tog, ch 1 turn
  9. sc2tog, 1 sc, ch 1 turn
  10. sc2tog, ch1 and then sc down side of flap toward opposite side of where you started the earflap, when you get to bottom, continue row 14:

1 dc in ea of next 18 stitches, then repeat steps 1 through 10 to make second earflap. When complete, finish row around with 1 dc in each stitch and sl st to top of ch 2, fasten off and weave in ends.

Contrast:
In contrasting color, (I used Shocking Pink) sc around bottom edge of hat and earflaps. I would start in back and then join with a sl st at end. Fasten off and weave in ends.

Eyes (Make 2):
In green:
Row 1: Ch 3, 11 dc into 3 ch from hook, sl st to top of ch 2 to join (12 dc).

Row 2: Ch 1, 1 sc in same stitch as ch 1 and 2 sc into each stitch around, sl st to top of ch 1 to join. (24 sc)

Row 3: Ch 2, 1 hdc into ea stitch around, sl st to top of ch 2 to join, fasten off leaving long tail (at least 12 inches).

In white:
Row 1: Ch 3, 11 dc into 3 ch from hook, sl st to top of ch 2 to join (12 dc)

Row 2: Ch 1, 1 sc in same st as ch 1 and 2 sc into each stitch around, sl st to top of ch 1 to join, fasten off leaving long tail (24 sc)

In black:
Row 1: Ch 3, 9 dc into 3 ch from hook, sl st to top of ch 2 to join, fasten off leaving long tail (10 dc).

Assembly:
Attach black circle to white circle using the black tail. (I like it to be off center, but you can make it look whatever direction you want)

Attach white circle to green circle using long white tail, if you stitch it carefully, you can make it so the white stitches do not show on the back of the green circle.

Attach green circles to hat, I like them to be evenly spaced apart from the center, but more towards the front at about row 4 of the hat.

Rosy cheeks and mouth:
In pink (make 2):
Row 1: Ch 3, 11 dc into 3 ch from hook, sl st to top of ch 2 to join, fasten off leaving long tail (12 dc)
weave in center tail, then attach to hat using long end tail.

In black, using back stitch and a tapestry needle, embroider mouth between the two cheeks.

Finishing:
Take 3 lengths of green, 2 of hot pink and 1 each of black and white yarn that are approximately 25-30 inches long (I just eyeballed the length) and loop center through bottom of earflap. Braid for 10-12 inches and then overhand knot. Trim yarn ends. Repeat for second earflap.

For PERSONAL USE ONLY, please do not sell the final product or claim the pattern as your own. I would love for you to share your work, but please link back to this pattern. Please do not republish this pattern in any form. Thanks!

UPDATE: Due to the popularity of this hat, I have had several instances where people have stolen pictures from this post to use to sell this hat which is not only dishonest, but illegal. I have had to watermark all of these images to prevent this from happening more. If you come across any of my photos that someone is using illegally to sell this hat, please let me know by emailing at RisCHandmade@gmail.com


Tuesday, August 16, 2011

Crochet Bow Hair Clip Pattern

I love how popular bows are becoming again. This crochet pattern I use for Hair Clips for my daughter, but it could easily be made into something for yourself too. I wore one on a headband once, but I felt a little silly. I am just not trendy enough for it and didn't think I could I pull it off. I'm sure I looked just fine, but I was self-conscious  about it the whole time. Maybe I will try again later when I am in more of a trendy mood :)


This pattern is put together just like the Little Guy Bow Tie so go to that post for specific instructions on how to put it together.

I also made an improvement to the Little Guy Bow Tie so be sure to check that out to. I added velcro to the elastic to make it easier to get on and off without having to pull it over their heads.

Bow Hair Clip Crochet Pattern
by Ris C

Materials:
Worsted Weight Yarn
Size H Crochet Hook
Yarn needle
Alligator clip or barrette
Ribbon (optional)
Hot Glue and Glue Gun

Bow:
Round 1: ch 6, hdc across (start in 2nd ch from hook): 5 hdc
Round 2-18: ch 1*, turn hdc across: 5 hdc
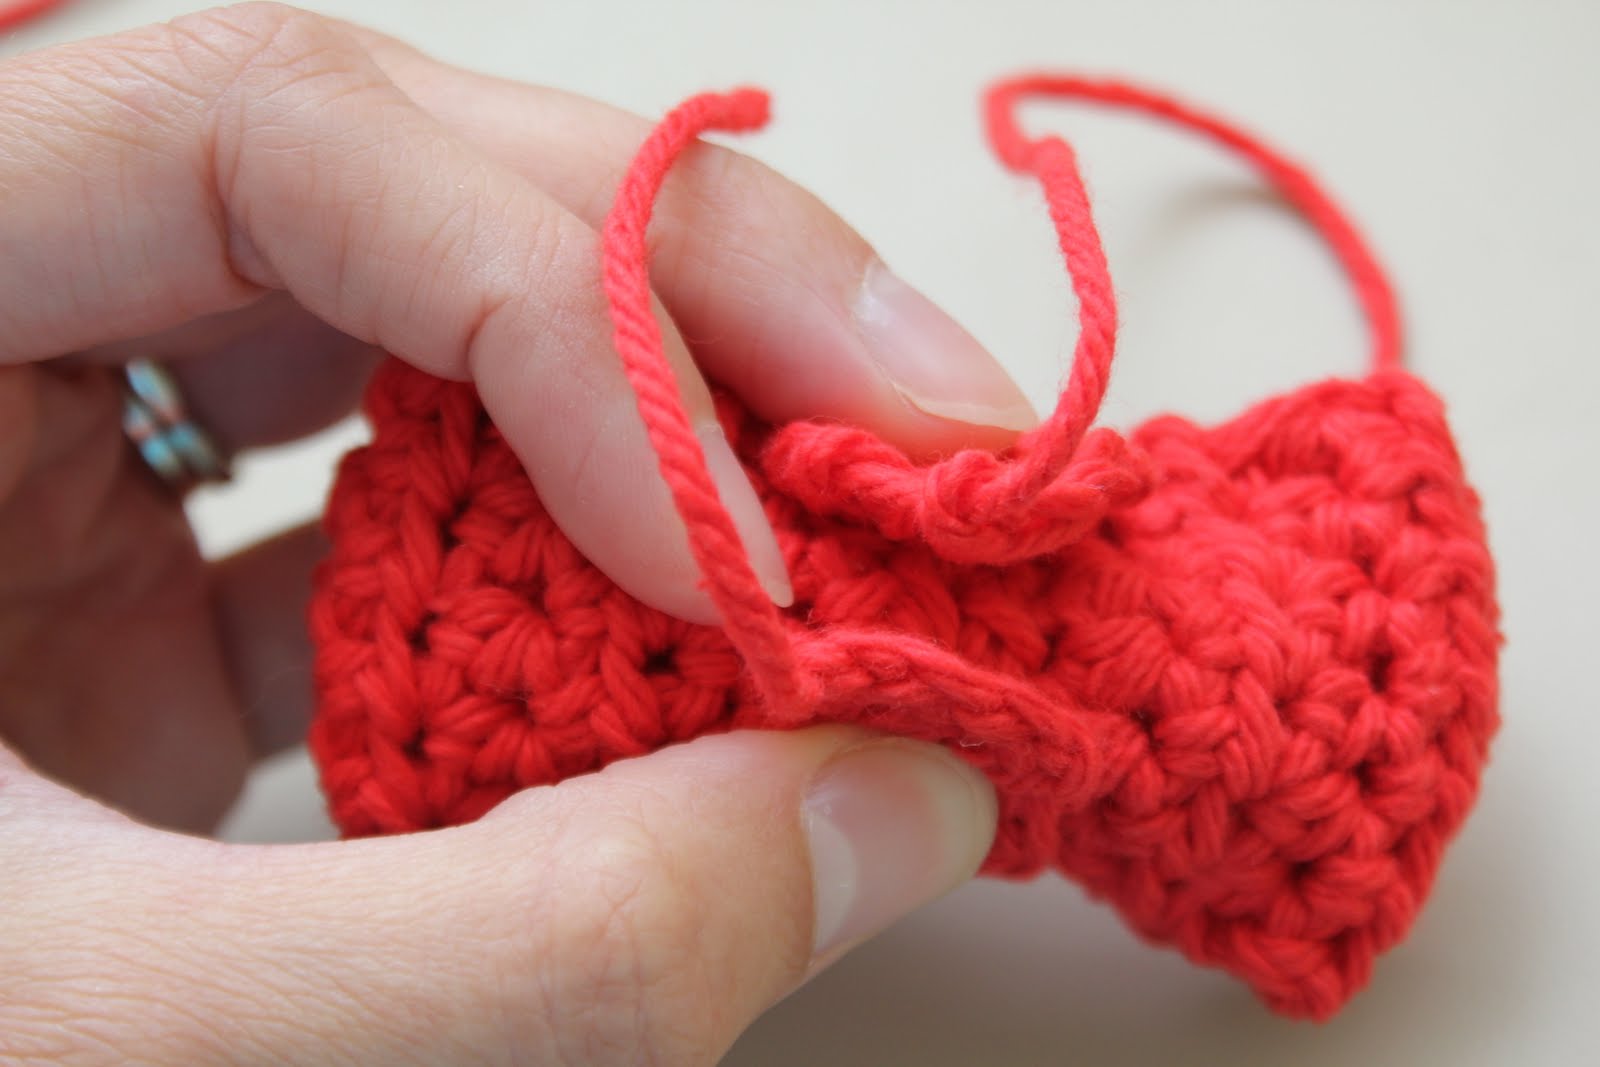
Sew round 1 to round 18 to form a cuff and then pinch center, sew through, wrap yarn around and knot to keep pinch in place.

Center:
Round 1: ch 4, hdc across (start in 2nd ch from hook): 3 hdc
Round 2-6: ch 1*, turn, hdc across: 3hdc
Wrap around center of bow and sew in back to form the center.

Glue ribbon onto alligator clip (optional) and then glue clip (or barrette) to back of bow.

*Technically you are supposed to chain 2 for a hdc, but for me, 1 chain seems to look better. Just do whatever works best for you. It all depends on how tight or loose your stitches are.


I have several colors of these bows listed in my shop if you would rather just buy them then make them :)

Shared on:
Creations by Kara


Sunday, August 7, 2011

Crocheted Little Guy Bow Tie

***Updated on 8/16/2011 Scroll down for improvement***

Today I am doing a guest post over at Belle's Bazaar so if you are coming over from that blog, Welcome! Heather is one of my first roommates from college and is out of town this week so she asked me to do a guest post while she is gone so go check it out. She is a talented lady so be sure to check her other posts while you're there.

I feel like I am always making stuff for my daughter so this time I made something for my little boy. I love bow ties on little boys and this crocheted one is so cute and easy. Anyone with basic crochet skills can do it and I will show you how. For those that can follow patterns, I will put the pattern first. I will then have step-by-step photos for those that need it.

Little Guy Bow Tie Crochet Pattern
by Ris C

Materials:
Worsted Weight Yarn
Size H Crochet Hook
Yarn needle
1/4" elastic and fabric-tac (or some other way of putting bow tie around your little guy's neck.) 

Bow:
Round 1: ch 7, hdc across (start in 2nd ch from hook): 6 hdc
Round 2-20: ch 1*, turn hdc across: 6 hdc
Sew round 1 to round 20 to form a cuff and then pinch center, sew through, wrap yarn around and knot to keep pinch in place.

Center:
Round 1: ch 4, hdc across (start in 2nd ch from hook): 3 hdc
Round 2-9: ch 1*, turn, hdc across: 3hdc
Wrap around center of bow and sew in back to form the center.

Lace a 12" or so (measure neck) piece of 1/4" elastic through back of the center piece and glue ends together with fabric-tac. If you do not have fabric-tac, use a sewing machine to zigzag back and forth a few times to secure the ends together.

***Improvement***
Alternatively, you can attach velcro to both ends of the elastic so that it does not need to be slipped over his head and to make it easier to get on and off.

*Technically you are supposed to chain 2 for a hdc, but for me, 1 chain seems to look better. Just do whatever works best for you. It all depends on how tight or loose your stitches are.


So those that need a little help:

Chain 7 to start and then in the 2nd chain from the hook, make your first half-double crochet (hdc)

Then hdc all the way across the row so you have 6 hdc and then ch 1 on the end of that. This is your turn.

 So now you can flip it over and hdc across the next row. Do this until you have completed 20 rows.

When your done, you'll have a 6x20 stitch rectangle. Leave a long tail and pull it through so your stitches won't come undone. Then make the center in the same way except only 3x9 stitches.


Fold it over so the short ends come together to form a cuff. Using a yarn needle, sew the edges together.
 It doesn't have to be pretty because it will be in the back and will be covered up by the center piece.
 Then with the same tail of yarn, from the back and pull needle through about 1/4 of the way from the edge.
 Then turn it around and go through front 1/4 of the way from on the other edge.

It will look this on the front before you pull it tight.

 Then pull it tight so that it cinches the center.

Wrap the tail around the front to keep it in place a little better and then tie it in a knot with the tail of yarn from the start.

Front view:

 Back view:

Take the center piece and wrap it around the front:

Bring the ends together in the back and sew them together like you did the ends of the bow. 

Finished bow from the front:

Measure the neck of your little guy (with a collared shirt on to be more accurate) and cut a piece of 1/4" elastic a little bit smaller than that. (Just be sure it will stretch enough to fit over his head). Lace through the center piece in the back of the bow.

Place a dab of fabric-tac on the end and then glue the other end to it.

Hold it in place for 10-15 seconds or so until it will stay in place on its own. 

***Alternatively, you can attach velcro to both ends of the elastic instead of gluing them (just glue the velcro to the elastic with the fabric tac) and then it is easier to get the bow tie on and off your little guy and you don't have to slip it over his head.


 Now you have a bow tie for your little guy that you can just slip over his head and tuck the elastic under his collar.
I had so much fun with these that I had to make a few in different colors.
 I make smaller bows on hair clips for my little girl too. I will have to post that pattern soon too.***Little girl Hair bow pattern is now posted here.

 
 I just love how cute my little guy is in it!

Shared on:


Creations by Kara


Craft Junkie Too Friend

Friday, June 3, 2011

Tips for Re-using Sewing Patterns

 Whenever I use a sewing pattern, I hate cutting up the original pattern. They are printed for multiple sizes and once you cut it up for a certain size, that is the only size that you can ever make. To add to that, the tissue paper it is printed on is so fragile that you can only really use it one or two times before they are too beat up to use anymore.

To be able to use a pattern multiple times and for different sizes, I trace the original pattern pieces onto old gift tissue. We have TONS of tissue paper leftover from wedding presents (its been 5 years, we never throw anything away) and it works perfectly for tracing patterns. It is see-through enough to easily trace, and it is big enough to fit most pattern pieces.

Here's how I do it:

1. Carefully tape original pattern sheet to table-top or other flat surface. Be sure to only place tape in spots that do NOT contain pattern pieces. When removing the tape, the tissue rips easily and you don't want it to rip right in the middle of a piece.


2. Place gift tissue on top of pattern. Use pattern weights, tape, or anything heavy to keep it from shifting as you trace (I learned this the hard way).


3. Trace pattern pieces and all of the markings of the size you are making onto gift tissue paper. I like to use a washable skinny felt tip marker.


4. Cut out pattern pieces and use to cut out fabric as indicated by pattern instructions.


Sometimes, I trace more than one of certain pieces (like pieces that need to be cut like 4 times in the fabric) multiple times to make laying out the cutting easier.

Another money-saving tip: Don't EVER pay full price for patterns. Joann's has sales several times each year where their patterns are only $1 each. Sign up for their adds and coupons and look for the sales. Also, there are many websites and blogs that have free patterns or tutorials so do a google search first if there is something you want to sew.

Shared on:

The Shabby Nest