Monday, April 9, 2012

Choco-PB Rice krispy Treats


My mom made the BEST Rice Krispy treats growing up. She had several variations, but this one was my favorite and I have never found a recipe like it. Most recipes either have PB or chocolate, or are PB with a chocolate top. These both the PB and the chocolate are incorporated into the whole thing and they are sooo good. Its a good thing it only makes a small pan because in my current pregnant state I could probably eat the whole pan.

Chocolate Peanut Butter Rice Krispy Treats

6 T butter or margarine
1/4 C Peanut Butter ( I like crunchy and I usually use closer to 1/3 cup)
1- 10oz. pkg marshmallows (about 4 cups mini or 40 large)
1/3 C Cocoa
4 C Rice Krispies
optional- 1/2 C nuts, raisins or chocolate chips  (I use mini chocolate chips)

Melt butter and PB in saucepan over med-low heat. Add marshmallows and continue to stir and melt until marshmallows are completely melted and smooth. Remove from heat and stir in cocoa. Lastly stir in rice krispies and chips/nuts until all are well coated. Spread evenly into a lightly greased 9x9 pan. Cool before serving. 

*My mom originally got this recipe from an old Hershey's cocoa recipe booklet. 

Linking up with:

Skip to my Lou

Saturday, April 7, 2012

New Things: A Brother and a sister

I have been horrible and keeping up this blog. The Etsy shop has been keeping me busy as well as my many other responsibilities and getting ready for baby. The baby is coming soon and I have been in full-on nesting mode trying to get done as much as I can before the big day. 

I am officially 32 weeks now, so technically 8 more weeks, but my first was a week early and my second was 3 weeks early, so I doubt I will have to wait that long.  I also realized that I never shared the gender! We are having another girl!!!

My daughter is so excited to have a sister. She talks about her all the time, how she is going to share her clothes and toys and how they will play together. I think she is going to be surprised to learn that a baby sister doesn't do much but lay there and sleep for a while. We are pretty sure she is expecting a full-grown sister to pop out of me. I am also excited, girls are so much fun to dress up and sew for. I also will have a new baby headband model so I can stop using my son.

In other news, we also have another new edition around here. Last month was my birthday and my brother and dad went in together to buy me a new sewing machine!! It is a Brother CS6000i and I absolutely love it. I have already completed several projects on it (which I still need to post about...so much to do!) It took a little getting used to because it so different and fancy compared to my old one, but man is it nice! 

I will be better and get some of those projects posted soon!

Friday, March 2, 2012

Princess Castle Cake


My daughter turned four this week so I made her a cake for her very first "friend" party. We are keeping it small and simple, a few of her closest friends for an hour. It should be fun. When I asked her what kind of cake she wanted, she told me a princess castle and I was so relieved. A castle is so much easier than a princess. (Last year, I made her a Cinderella cake and it was so hard!)

I am not a pro by any means, but I feel like I am getting better with each cake I make. I have never taken a class, I just go by what I find on the internet and see on shows like Cake Boss and Ace of Cakes. Here is how I did it:

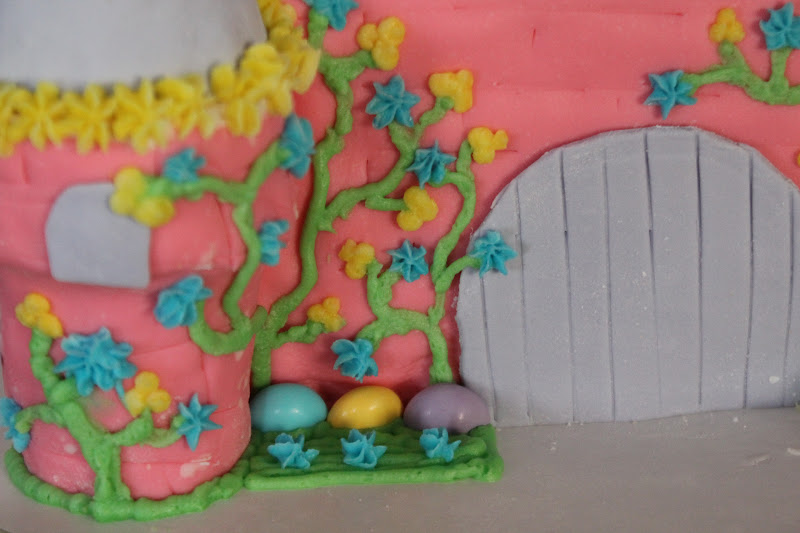
I found some ideas off of Pinterest and kind of made my own version of it. All the cake is from one funfetti cake mix, baked in a 9x13 pan. The four towers are made from ice cream cones (regular on the bottom and sugar cones for the roofs). They are covered in marshmallow fondant (I used this recipe). I also used buttercream frosting for the filling, the "dirty icing" and for the ivy/flower details. The candy is white chocolate Easter M&M's.
 I cut the 9x13 cake into two large squares and two smaller squares (there was a little bit of cake leftover), and then stacked each of them using the buttercream frosting as filling.

I dirty iced each stack, and then covered with pink fondant. I am not a pro and I have no idea how people get their fondant so smooth and even. Mine always looks bad at this point, but I cover up the imperfections later.

 I stacked the small stack on top of the large squares, with some toothpicks for support. I then dirty iced and fondant covered 4 ice cream cones and attached them to the four corners using toothpicks as well.


 Then I dirty iced and covered the sugar cones with purple fondant and then attached to the ice cream cones with a ring of buttercream.

 Using a razor blade, I imprinted the walls and towers with a brick pattern. I then cut out more purple fondant for a drawbridge door and windows and attached them using buttercream.

Now the fun part, I colored buttercream frosting green, yellow and blue and decorated the bottom with piped ivy, flowers, and covered up the imperfections. I also added the M&Ms for a little more color and to cover up the messed up fondant in between the two levels. 


 Finally, I added little paper flags to the tops of the minarets that said "Happy Birthday..."


It took me pretty much all day to make, and that was with my mom's help. I am so glad she is visiting, she helped take care of the kids while I did it and was my assistant, washing things or getting things ready. It would have taken me so much longer if it wasn't for her.

Linking up with:
Family Ever After
Skip to My Lou 
Creations by Kara
Monday, February 20, 2012

Teal Petal Dress


Last month I saw this darling dress and tutorial on icandy:

Its one of those dresses that as soon as I saw it, I knew I just had to make it. I see a lot of cute dress ideas and think "I should make that", but this one was different. I was so excited by this one and knew how much daughter would love it. Ideas immediately started coming to me as I planned it in my head.

I started with a twin size sheet that I found at wal-mart for $5. I knew that if I let my daughter pick the color, she would choose pink, but I wanted something bolder so I went with this teal blue. I thought it would be such a pretty color on her, and it really is. She has gray-blue eyes and this color really brings out the blue.


I followed the tutorial on icandy almost exactly, except making the bodice a little narrower for my skinny girl (I probably could have made it even narrower) and I made puff sleeves.


I also chose to sew the petals to the skirt before sewing it to the bodice while it was still one big rectangle. I layed them out and rearranged them a few times before I was happy with it. I also cheated and used the finished edge of a side of the sheet as the bottom hem so I would not have to hem it.

I left one petal off the back center and added it after it was all sewed together because it was right on the middle of the seam. It hid the seam well and gave the petals a more continuous look in the back.

I had a sash for the waist cut out of the teal fabric, but I thought it needed some contrast. I found some wide black grosgrain ribbon in my stash and it was perfect. The black and teal look great together and the stiffness of the ribbon makes for a big bow when tied in the back. I tacked it down in a few places in the front and sides to keep it in place.


I took the fabric I had already cut for the stash, cut it into long strips and made these folded fabric roses. They were originally going to be for a headband, but I loved how they looked on the waistband. I think they really complete the whole look. I made one more for a matching hair clip too.


My daughter's 4th birthday is coming up next week and I was going to save it until then and give it to her for a birthday present, but I just couldn't wait to have her try it on. I finished it in time for church yesterday and decided it will just be an early birthday present.


The best part is that she loves it, even though it is not pink!

Linked up with:
Made by You Monday on Skip to My Lou 


Creations by Kara


This dress in my official entry for sew-vivor! Wish me luck, the competition is fierce!

Wednesday, February 15, 2012

V-day Re-Cap

 How was your Valentine's Day? My husband had parent-teacher conferences (who schedules those for Valentine's Day anyway?) so he had to work late. My kids and I had fun day together though. 

My daughter got all dressed up to finish some of her Valentine's (she likes to do things in style).

And then her brother had to get in on the action too. (My husband doesn't really approve of him wearing crowns and headbands, but I figure its better than a tutu.) He has fun and that is all that matters.

For dinner we had heart-shaped pizza with heart-shaped salame


Then we had these yummy chocolate waffles (recipe here) for dessert with fresh strawberries, chocolate syrup and real whipped cream.

After the kiddos went to bed, I worked on some projects while watching Breaking Dawn part 1. The hubs had homework, but I am getting pretty used to watching movies by myself. It was a great day!

The good news is he is almost done just 1 1/2 more classes to go. I cannot wait.

Tuesday, February 14, 2012

Happy Homemade Valentine's Day


Every year for Valentine's Day, we try to make homemade cards. Right now my daughter is only 3 and has only 5 kids in her preschool class so this is very doable. I know in few years as her class size get bigger, we won't be able to do as much, so we are enjoying it while we can.

We decided to use paint this year and do potato stamps. I also saw this cool idea on Pinterest and thought we'd give it a try only with Romaine instead of celery. It didn't turn out as good or as pretty as theirs, but it was still pretty cool.


The potato stamp worked well though and it was so fun for my daughter to stamp with a potato. I just free-handed a heart onto a halved potato, then cut it out. Super quick and easy and I like that it is not perfect. It adds to the handmade charm.


Then on the inside, I lightly wrote Happy Valentine's Day Love, A* and my daughter traced the letters in markers. She likes to write herself, but gets frustrated when she doesn't know the letter so this is our compromise for now. We are still working on writing from left to right and not right to left too, but she is doing just fine for a 3 almost 4 year old.

Happy Valentine's Day!!! We hope you have a special day filled with love!

Tuesday, February 7, 2012

What I've been working on...

I have spent every free moment that I have had the last month working on a pinwheel quilt for my daughter. It is my first quilt and it is twin sized. I should have started smaller, but I like to just dive into things. It has been quite the learning process, but I am happy to announce that I finished all of my pinwheel blocks last night and now I just need to sew them all together (and do a bunch of other things...). I can't wait to show you guys when I am all done.

I just hope that my 30+ year old machine will hold up long enough to finish and let me free motion quilt it when the time comes. There have been quite a few nights where I have just wanted to throw the machine out the window, but I have resisted. 

Wish me luck!!!